Turning github into a CMS
I originally created this blog as an excuse to experiment with the JAM stack, but I quickly realized I didn’t really need any CRUD functionality; it’s just a blog, no forms or uploads to speak of. The initial code for that never made it to a git repo, and frankly didn’t get too far past an npx create-react-app.
I still wanted to create a fast, responsive, accessible site that’s templatized and just needs markdown changes to create new stuff. My old blog was an experiment in using the LAMP stack to do something sort of like this, but it was really cumbersome; I ended up storing the markdown content for the posts in a MySQL database, so it was still fairly technologically intensive to update.
Jekyll + GitHub Pages
That’s when I realized that Jekyll and GitHub Pages would probably be a good fit for this. I’d used both at work (Jekyll for an abortive first-stab at a company-wide branding guide site; GitHub Pages to host the documentation for my component libraries), but had always used them with a workflow like this:
develop stuff locally
  |
  V
do a manual build locally
  |
  V
push build artifacts to GitHub Pages
It was somewhat convenient. Jekyll let me write content in markdown, which made it way more portable and way more approachable to non-tech folks. GitHub Pages is free, pretty much infrastructure-less, and well-documented. But the need to manually build then push build artifacts to a hosting environment seemed like a rough edge I could sand off.
Adding Travis CI
Never do something yourself that a robot can do for you. The steps to build and deploy a Jekyll site on GitHub Pages were repetitive, so I went looking for a robot who could do it for me.
I went with Travis CI because it has great integration into GitHub, and is also free and relatively infrastructure-less.
The basic setup was pretty simple: I connected my Travis CI and GitHub accounts, added my GitHub access token to Travis CI’s secrets manager, and created a .travis.yml file.
Caching
Probably the most important improvement I made in the whole process was to set up Travis CI to cache correctly! I ended up doing this:
cache:
  directories:
    - /home/travis/.rvm/
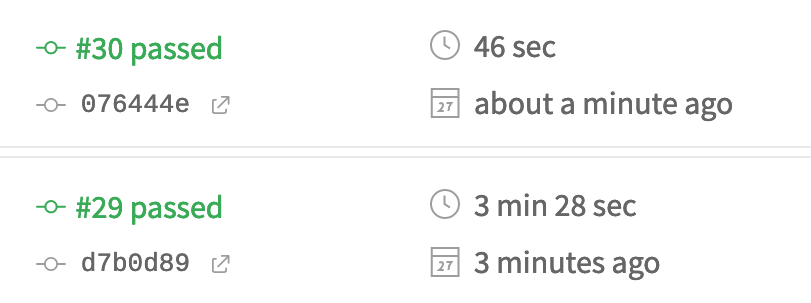
It reduced my total build times from an average of 3 minutes 20 seconds to an average of 45 seconds, or about four times faster.

You can see the full build log for this blog at https://travis-ci.org/chadlavi/blog/builds.
New workflow
I actually completely composed this blog post (and even added the image above) directly in the text editor on GitHub. With Travis CI set up to automatically run builds whenever new changes are committed on the master branch of this repository, I can basically treat the Create new file text input like it’s a markdown-specific CMS.
I’m anticipating that this is going to mean a lot more freedom in how I can add new blog posts or edit existing ones in the future; the only thing I can’t do directly from GitHub is preview changes accurately, or change more than one file per commit. This will probably mean sort of a separation of concerns: markdown I can compose and upload from anywhere, but template or infrastructure changes will still need a more traditional dev setup.